Saturday, 17 January 2015
 Facebook
privacy is a great problem, no doubt Facebook is doing huge efforts in
providing best privacy as much as they can. But some of the little bit
bugs and other privacy issues always remains same. Facebook has no ways
to make them secure just because these bugs can be directly accessible
for database. Some bugs are also present which cannot be fixed from huge
time just like of Making Single Name Account. Which i posted around 2 years ago and till now its working fine. So Today I am going to discuss another amazing Facebook trick related
to Profile picture and by using this trick you can easily open an
locked profile picture with simple and easy way. Actually this not an
hack or even you are not breaking any kind of Privacy. In this method
you are directly making some changes which helps you to access that
profile photo which is present in Database in actual size. I already
reveal huge number Facebook tricks and tutorial if you interested then
must check them out here All Facebook Tips, Tricks and Tutorial.
Facebook
privacy is a great problem, no doubt Facebook is doing huge efforts in
providing best privacy as much as they can. But some of the little bit
bugs and other privacy issues always remains same. Facebook has no ways
to make them secure just because these bugs can be directly accessible
for database. Some bugs are also present which cannot be fixed from huge
time just like of Making Single Name Account. Which i posted around 2 years ago and till now its working fine. So Today I am going to discuss another amazing Facebook trick related
to Profile picture and by using this trick you can easily open an
locked profile picture with simple and easy way. Actually this not an
hack or even you are not breaking any kind of Privacy. In this method
you are directly making some changes which helps you to access that
profile photo which is present in Database in actual size. I already
reveal huge number Facebook tricks and tutorial if you interested then
must check them out here All Facebook Tips, Tricks and Tutorial.
Steps To See Locked Profile Photo on Facebook
- First of all you need a Username or Profile ID of person whom profile picture you want to see.

- Just copy the Username and Profile ID in notepad or anywhere.
- Then replace the Paste-username-here from the below given link with the Username or profile ID.
https://graph.facebook.com/Paste-username-here/picture?width=800
- Then it will looks like as below.
https://graph.facebook.com/iPahulSingh/picture?width=800
- Now to copy link and paste them into new tab of browser.
- Press enter and see magic.
I hope you like this trick and if you enjoy this trick don't forget
to share it with others. For any kind help regarding to post must leave
your comment.
How To Open or View Facebook Locked Profile Picture - 2015

How To Disable Blue Ticks from WhatsApp
If you are really not satisfied with this feature then don't worry you
can remove or disable this "Blue Ticks" or check marks. To remove this
feature people not able to know that you read their message or not. May
be some people know how to disable o remove these blue tick but those
who don't know don't worry just follow below given steps to remove "read
receipt".
WhatsApp New SEEN Update: Read Receipt/ Blue Ticks Function

Download From Google Play Store

Step2:- After Downloading new version >> Click on your WhatsApp account settings.
Step3:- Settings>> Then click on Account>> Privacy.
Step4:- Scroll down and you will find "Read Receipt" feature option. It will show you Tick on it Simply just Uncheck the tick option.
Another Method
Step1:- Download WhatsApp+ (Plus) from Gogle Play Store.
Step2:- After Installing WhatsApp Plus go to your WhatsApp menu and and click on Hide blue Ticks.

Note:- Those person who already have new version of WhatsApp they
can simply follow the above steps and remove read receipt but those
person who have not find Read Receipt option in privacy setting firstly download latest version of WhatsApp then follow the above steps.
How to Disable/Remove Blue Seen Ticks In WhatsApp - 2015

In my previous posts I have mentioned you how you can use the Facebook
Graph API to create some cool emoticons. If you have missed it then read
it here: Special Facebook Secret Emoticons and Picture Smileys
Now let me show you how you can make your status update or comments as a
link having the default Facebook blue color.So how to do it? Well its
really simple. Just enter your message in a specific format.
1. Copy sentence which is below and replace the text “YOUR STATUS OR COMMENT” with the message you wish to post.
@@[3:[0:3:YOUR STATUS OR COMMENT]]
If the above code doesn’t work you can try this:
@@[2:[0:2:YOUR STATUS OR COMMENT]]
That’s it press enter and your status update or comment will be posted as link in blue color.
How to write facebook status or comment as a link in blue color?
Facebook Pages are playing vital role in Digital Marketing. For any kind
of business weather its online or offline but Facebook Page is must to
represent their business and work. No doubt Facebook pages helps to make
better relationship with Customers and other followers. If increase our
business sales and popularity. In these days Facebook pages are
increasing at large extend as compare to accounts. So Facebook apply
some limitations because no spammer are creating spam with lot of
Facebook features by misusing them.
One of the best feature of Facebook is Page merging actually Facebook
introduce this feature to reduce the number of duplicate pages of same
name. But Some clever page admins misuse this option and compel Facebook
to make limitations on merging. They Change different name pages approx
or exact same as the name of page then change it and merge them. In
this way the increase likes on their pages.
")
What is Merging ? What Limitations Facebook Apply ?
Merging is a technique which helps you to merge Facebook pages which are
of same name not different. Suppose i have 2 pages of name Max33d both
pages having like 1k instead of using them separately i merge them it
become page with 2k likes. If don't know about merging or how to merge
pages then method my tutorial about
But some users use some tricks to change Facebook page name and after
changing they merge them. Which is against Facebook policies. So to
control this issue Facebook apply limits. Facebook make limits of 4,5
pages means you can only merge upto 4,5 pages with same name after that error will occurs Which is something like.
"An error has occurred while merging pages. This May Be Caused by your attempt to merge too many pages "
Solution of Merge After Error
Facebook officially introduce the request procedure for merging. By
using this method you can merge pages after error or even if you are
Facebook error by mistake but the make issue is this feature currently
available is USA, CA and UK. So don't worry today i will explain you how to request Facebook to merge them.
Settings For Merging in Chrome
- First of all Open Google Chrome and the download Hola Better Internet Extension.
- After installing this extension small extension icon will appear.
- Click on the Icon and select US or Canada to apply proxies.
- After Selecting make sure its working or not.

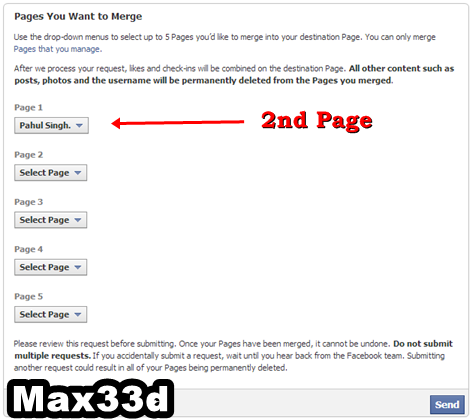
Steps For Merging Pages
- Now Log in into your Facebook Account
- Then to merge Facebook pages Click Here
- If the form will appear then its fine other refresh that form again or otherwise change your country in Hola Extension.
- Select Your Page in 1st Page option ( Page Which want to keep)
- Tick the box and select 2nd Page which you want to merge.
- Make Sure that you select same pages in accurate manner
- Now Submit Your request.

After Submission wait for email request for your request which will take
around 24-48 hours or upto 1 week. In case your request will be denied
then again request Facebook in same.
Note:- Don't submit multiple
Request to Facebook about merging same page until Facebook response
back your first request otherwise it may leads your page deletion.
Best Way to Use This Request Method
- Make Sure that your both page names should be same. If you want then read about Changing Page Name After 200+ Likes
- Page Category Should be same for both page ( Local Business Recommend)
- If your Pages having Addresses then add same address in both
- Try To make Your both Pages similar as much as possible this will increase the chance of request approval.
- By using this request method you can merge Big Pages Into Small pages also. But names of both pages should be same.
This form officially introduce by Facebook about merging. Sometimes
Facebook merge pages as frequently. I also use same form to merge huge
amount of pages. I hope this method will solve your merge issue. If you
have any kind of problem must share your view in comments.
Merge Facebook Pages After Limit or Error (Official Request)

create different pages and events on Facebook but the problem we face is that we don't get enough members or likes. So we invite all our friends one by one, but again this is not easy as inviting all your friends one by one will take a large amount of time. To save this time which people waste on inviting their friends I have come up with some scripts. There are some more codes and scripts available on net but those does not work now as Facebook has changed its layout. This trick is latest 2014 edition code without any problem. Now lets get started.
Note That This Code Is Only Working On Google Chrome Browser

2. Now press F12 on your keyboard. Chrome console window
opens.

3. Now copy the code given below and paste it in the console window. Press
enter. For page invites use the page code and for event invites use the event
code given below Code to Invite All Facebook Friends With A Single Click 2015
FOR PAGES
var inputs = document.getElementsByClassName('uiButton _1sm'); for(var i=0; i<inputs.length;i++) { inputs[i].click(); }
FOR EVENT
javascript:elms=document.getElementsByName("checkableitems[]");for (i=0;i<elms.length;i++){if (elms[i].type="checkbox" )elms[i].click()}NOTE: When you copy the above code, our link will also be copied so make sure to remove
the link before executing the code in the console window.
It will automatically invite all your friends to your page with just a single click. If you have a
long list of friends then this may utilize more time and the page may look unresponsive for
some seconds. You can use this code to invite all your friends to any page or event, and it
does not come in spamming so don't worry, Facebook won't do anything with your account
Code to Invite All Facebook Friends With Single Click 2015
easy ways to change your name on facebook after limit –
Learn how you can change
your Facebook username after the exceeded limit-
Many of us see that our friends change facebook name
frequently. There may be many
causes for doing so. May be they did not want to
use their original name or may be they
want to make their facebook name more
attractive then before. In all cases, keep in mind
we did not always succeed to
change it. Some time we exceed the limit how to change your
name on facebook
after limit . So in this article we will learn how to change your Name on
Facebook after limit how to change your name on facebook after limit .Yes there are many
ways to doing so. If you are change it first time then
you did not need any trick to do so.
But keep in mind There is a limit. It is
because of security and also facebook is a social
networking site so it doesn’t
allow to change the name always.But it also did not means
that you can’t try.
Here are 3 easy ways to change your facebook
Username after exceeded the limit . All of these methods are working accurately
according to me. If you are having any issue while doing so, then feel free to
contact us :)
 |
| How to change your name after limit |
Keep in mind only use these methods if you already have changed your name for many
times. If you are doing it first time then you need to play with any trick. you can easily do
it just by clicking of settings and then click on edit your username button. If there is no
option to edit it in edit facebook name box then it means you have exceeded your limit
how to change your name on facebook after limit . Don’t worry try my these trick they
will definitely work for me how to change your name on facebook after limit .
"Also Read- How To bypass Facebook Photo Tag Verification 2015"
Method 1 : Change you FB username by sending
name changing request :
It is the safest and easiest way to change your facebook name without having any issue
with your profile. You just need to fill up the facebook name change request form and
submit your all required document to it by uploading. I prefer you to use your CNIC to
very your identity because it is easy and fast to approve by them. Form will be look like
This.

Method 2 : Change your name on facebook by adding page :
Surprise to hear but it is true you can also change your FC username by
adding a page. For doing
so please follow the step given bellow.
1. Create a new Facebook Page or you can also use an existing page which have
below 200 likes.
2. Now open the page and click on Edit page and then click on Update Page
Info.
3. Now Click on Edit Facebook Web Address. and then click on Change We
address and replace it with
your username.
4. Now click on check availability button. after checking a message will
appear that
will ask you something like “your page username is currently set as
the username for your timeline.
Do you want to change it to be the username for
this page? you may only change this once”. As
show in figure bellow how to
change your name on facebook after limit .

5. Click on Transfer Username button.
6. That’s all now go to setting >> general account settings >> and change
your username.
Save it and refresh the profile page and check its address how to change
your name on facebook
after limit and enjoy this trick
Method 3 : How to change your name on facebook after limit exceed by deactivating your account how to change your name on facebook after limit
It is totally secure and legal. you have not to deactivate the account in real. So, don’t be worry how
to change your name on facebook after limit . It is a funky trick. Bellow are some steps you need to
follow :
1. Login into your Facebook account and click on settings. In the drop down menu of name settings
set a name from already suggested names list.
2. Now Click on Deactivate your account.
3. Facebook will ask you the reason for it. Select the option ” My account was Hacked“.
4. Now a box will be displayed with a text “You can secure your account here“. Click on it and follow
the steps.
5. After following all steps you will be able to change your Name. After change it, Don’t forget to
change your password.
That’s all, you have done it. So, these are 3 easy ways to change your name on facebook after limit. I
hope you like this. Please share it with your friends and in social networks. If you have any question
or having any problem regarding these tricks feel free to comment us. We will help you in all
manners :D
how to change your name on facebook after limit

There was an error fetching required information for producing app result. Either
you skipped the permissions we asked for. Please try again and give necessary
permissions.

To Fix this, Click the above button to authenticate and Allow necessary
permission
and to access your Friends list and access your Public profile Information.
These Apps never spams Groups, Friends Wall, Comments, Mislead, Fraud, nor Post
without your consent etc. Trust us, Thank You!
How it Works:
Your Facebook ID Card is an app which will generate an
identity card for you. This ID Card
will contain your name, your birthday, city
of birth, and the country you live in. This
information is fetched from Facebook
with your permission. And Xee Fun Apps generate
this ID Card for you. This is
not an official app from Facebook, and is only a fun app.
If you enjoy it, then
share the id card with your friends.
Create Your Verify Facebook ID Card

Once you publish a post on your blog or website all you need to do is to expose it and the
best way is by sharing it on social networks and other social bookmarking sites. Out of all
one of the best source for getting traffic to your new blog post is ?? Is from Facebook
Groups. :)
Also Read : Code To Invite All FB Friends With Single Click
Also Read : Code To Add All FB Friends To Facebook Group At Once
So the question now arises. Have you joined Blogging Facebook groups or other FB
groups of your Niche ? Do you share your posts on them ? How much time does it takes to
share your post on all fb groups manually ?
I know it takes a lot of time. What if I share with you a method which I use and it takes me
only 5 minutes to share my post in more than 70 groups. Yes its completely free, easy and
safe. Its not like other methods where you have to login with your Facebook ID and then
post, Its also not like collecting all the Facebook group ID's and then mailing on them. ( You
will find this method everywhere on net ). So today I have come up with this post on my
reader's request.
Steps to Follow:
Firstly install a social sharing widget on your blog. We use ShareThis widget for blogger.
Make sure you add the Facebook SEND button on it. After Installing the sharing widget
open up any post of your blog and scroll down at the end of the post. It should look as
shown below.

Now you are done, just click on SEND button and a drop down lists will come showing your
friend list and your groups. Just type anything relevant to your post in the message box and
select all your groups in recipients as shown below.
After selecting all your groups just click the send button. It will now automatically post to all the selected groups. To confirm, just go to the activity log on your facebook profile and you can see all your posts.
This trick will surely save your time. Share this with your friends and other bloggers. If you
have any problem installing the widget, feel free to comment below or contact us.
How to Share Your Post to All Facebook Groups By A Single Click

~New Method To Bypass FB Photo Tag Verification 2015
New Method To Bypass Facebook Photo Tag Verification Which Is 100% Working Shared by Salman Khan..!!
"Facebook Photo Tag Verification"
Step 1: Go To Your Phone Or PC Proxy Setting For PC Use Google Chrome
Go To Setting:
After Setting Click On ~Show Advance Setting
Now Search For "Network And Click On "Change Proxy Setting"
Now Click On "LAN Setting"
Add The Following IP Address And Port No:
Change Proxy From Your Original IP into 157.7.152.61 Port : 3128
Follow The Following Picture

Click On OK OK
After This Go To Facebook And Login With Your Facebook Block Account
You Will No Seen Any Photo Verification Just You Enter Your Number
And Enjoy...
If You Are Facing any Problem Feel Free To Ask In Comment :)
New Method To Bypass FB Photo Tag Verification 2015
Thursday, 8 January 2015
![[IMG]](https://lh3.googleusercontent.com/blogger_img_proxy/AEn0k_vvXrkUh4f_BPOmtBw_kcRt4XyDt3EWy6_PxeuW-RExnK7Mr1vs-xsygJKxiJwRUn0xz_b0qmTMEZKU_LRf-fgVZNSQFRkAWhvcBU8WhVJMsMcKv_Nqz6eUB3LSBA_OcMw-CyhygyFPwkYZGcvvX21asVfcyL3MigXPdS1pfU1Qstk6kRYORZ6_-Ih5dK9s=s0-d)
How to jailbreak iOS 8.1.1 and iOS 8.1.2 with TaiG
TaiG team updated their jailbreak to support iOS 8.1.2, which was released by Apple to fix some bugs and address a problem where ringtone purchased through iTunes Store may have been removed form your device..
Here’s how to jailbreak your device running on iOS 8.1.2 using TaiG jailbreak.
Some important points before you proceed:
TaiG jailbreak supports following iOS 8.1.1 and iOS 8.1.2 devices:
- iPhone 6, iPhone 6 Plus, iPhone 5s, iPhone 5c, iPhone 5, iPhone 4S
- iPad Air 2, iPad Air, iPad 4, iPad 3, iPad 2
- iPad mini 3, iPad mini 2, iPad mini
- iPod touch 5G
GUIDE:
Follow these instructions to jailbreak iOS 8.1.2 using TaiG jailbreak.
Step 1: Download the latest version of TaiG jailbreak from this link on your computer, and unzip the zip file.
TAIG 1.2 Jailbreak
Step 2: Connect your device to your computer using the USB cable.
Step 3: Disable Passcode from Settings > Touch ID & Passcode.
Step 4: Also turn off Find my iPhone from Settings > iCloud > Find my iPhone.
Step 5: Launch the application as an Administrator. Right click on the TaiG exe and select the “Run as Administrator” option.
Step 6: TaiG will take some time to detect your device. Once you confirm that it is showing the correct firmware version, deselect the TaiG App Store (the one in Chinese), just below Cydia 1.1.16.
Step 7: Click on the green jailbreak button to proceed. You will see the circular progress bar.
Step 8: After the jailbreak is complete, your device will reboot automatically, and you should should see the Cydia icon on the Home screen.
Enjoy new iDevice with a lot of customization and free paid apps!
How to jailbreak iOS 8.1.1 and iOS 8.1.2 with TaiG
Bitcoin’s momentum among key merchants and platforms on the web keeps accelerating.
After hinting at it a few weeks ago when Braintree enabled Bitcoin-based transactions for PayPal developers, the company is now enabling Bitcoin across the PayPal network for merchants of digital goods.
The company has expressed interest in bitcoin for a while, with eBay CEO John Donahoe saying in the past that it would play an “important role” in the company’s future. Now that large players from Overstock to Wikipedia are now relying on the cryptocurrency for a part of their transactions or donations, PayPal is stepping in.
Through partnerships with BitPay, Coinbase and GoCoin, PayPal will let its merchants accept bitcoin for digital goods transactions. They decided to go with a handful of launch partners instead of a single one, as PayPal’s Braintree did with Coinbase earlier this month. To be clear, this isn’t about adding Bitcoin to PayPal’s digital wallet and it’s only in North America for the moment. These are baby steps for now.
“This is a huge endorsement to the digital currency community,” said GoCoin CEO Steve Beauregard.
PayPal will earn transaction revenue through referral fees, which are pretty common throughout the payments world.
“PayPal is playing the role of the intermediary, but the cost will be left up to the merchant and the payment processor,” said Scott Ellison, who is PayPal’s senior director of competitive intelligence and corporate strategy.
Source: http://techcrunch.com/2014/09/23/paypal-bitcoin/
PayPal says yes to bitcoin
- 123456
- password
- 12345678
- qwerty
- abc123
- 123456789
- 111111
- 1234567
- iloveyou
- adobe123
- 123123
- admin
- 1234567890
- letmein
- photoshop
- 1234
- monkey
- shadow
- sunshine
- 12345
- password1
- princess
- azerty
- trustno1
- 000000
Top 25 worst passwords
Subscribe to:
Comments
(
Atom
)


